WOW!!! I just realized it has been a while since my last post in my blog.
Anyways, here is the last assignment for the class of photography in Harmony ED. Systems for extra points:
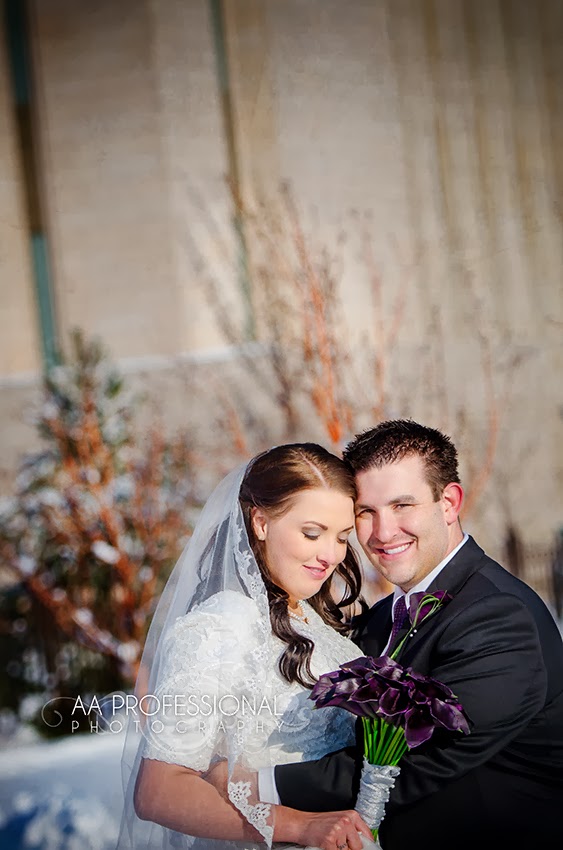
To submit 5 photos (one of each of the following categories):
- Portrait
- Landscape
- Wildlife
- Still life
- Creative (anything you want that is creative).
These photos can be from past assignments (your best shots) or brand new photos taken this week, including, if you want, photos from our field trip on Monday.
You can print them and bring those next week OR you can email them to me to: aaphotoart@gmail.com
See you on the 28th (FYI: the last day of class of photography of the year).

Weddings Photography, Family Portraits, Children Portraits, Modeling Portraits and Portfolios, Fine Art and Commercial Photography. Custom Projects. In business since 1998. Galleries at: www.aa-photography.com Give us a call at: 801-603-9837 E-mail to studios@aa-photography.com
Tuesday, April 22, 2014

Monday, February 03, 2014
Leading Lines Homework
As part of the Harmony Education Photography Classes I have the samples of "Leading Lines" we talked about during class today.
As I mentioned before, I will start doing the homework myself, from here on, in every homework I assign you to do.
So, here are my 6 photos of "Leading Lines" using one subject only as the main subject. (The secondary subject are the lines itself).
Ask me if you have any question and/or comment.
Please turn your homework as early as possible. See you next Monday!! :D
Tuesday, January 14, 2014
Low Light photographs
As a photographer I constantly have the blessing to work with marvelous people, ALWAYS! and yesterday (January 13th 2014) was no different (As an aside note, I've come to realize that once in a while, when I work with a difficult customer, is because is me who don't see the qualities I like to see, or just because we are not communicating as good as we should, and therefore I don't see those qualities right away in them, but without a doubt, they ALL are great!).
Anyways, yesterday, as I just finished from working with a customer and leaving their house, I've got to see an spectacular view of the mountains as the sun set in the horizon. and the lights of the city below getting on.
These are some of the photographs I took yesterday night. I don't think is needed to say the cold of the night, the fast drop of temperature, me being tired or any of the side effects of night winter photography, BUT I truly had the relaxation I needed after a long day of work.


Please comment if you like or agree or disagree with me in anything I had say. Thanks for stopping by and reading my blog.
Tuesday, January 07, 2014
Hard Light vs Soft Light
As part of our lesson last Monday (Jan 06th 2014) we discussed the quality of light and learn how to find it in everyday, in every place we go.
We learned about "Hard Light" and "Soft Light".
For the assignment, I asked to take 2 photos, one should be showing a place or a thing with Hard Light and the other photo to show an example of Soft Light.
I am posting 2 photos I took not long ago showing both qualities of light.
SOFT LIGHT
1.- The first photo is a snowscape during snow fall. Overcast days are great to find Soft light EVERYWHERE!

2.- It's good to get wildlife with soft light because dark feathers will not be SO dark, and we can record details in darker areas. This is something not always achievable.

3.- Some portraits are GREAT when done in Soft Light. There is something magical.

HARD LIGHT
1.- Most photographs, when done correctly, are more vibrant when done in Hard Light. This is another snowscape using the sun in its full brightness early in the afternoon.

2.- Tender portraits can be done using Hard Light if done correctly. Here we have a husband and his wife enjoying time together feeling the babies kicking (YEAP! they had twins!).
 3.- Portraits when done correctly, using the available sun light, can benefit you.
MIXING LIGHTS
1.- This is an example of mixed quality of lights: Hard (direct sun light) and Soft (all the surrounding areas in the lake.

2.- This is another example of mixing both quality of lights... I am using the SOFT light that hits their faces and the front of their bodies while the Hard Light comes from behind lighting the top of their heads and some of the visible snow.


We learned about "Hard Light" and "Soft Light".
For the assignment, I asked to take 2 photos, one should be showing a place or a thing with Hard Light and the other photo to show an example of Soft Light.
I am posting 2 photos I took not long ago showing both qualities of light.
SOFT LIGHT
1.- The first photo is a snowscape during snow fall. Overcast days are great to find Soft light EVERYWHERE!
2.- It's good to get wildlife with soft light because dark feathers will not be SO dark, and we can record details in darker areas. This is something not always achievable.
3.- Some portraits are GREAT when done in Soft Light. There is something magical.
HARD LIGHT
1.- Most photographs, when done correctly, are more vibrant when done in Hard Light. This is another snowscape using the sun in its full brightness early in the afternoon.
2.- Tender portraits can be done using Hard Light if done correctly. Here we have a husband and his wife enjoying time together feeling the babies kicking (YEAP! they had twins!).
MIXING LIGHTS
1.- This is an example of mixed quality of lights: Hard (direct sun light) and Soft (all the surrounding areas in the lake.
2.- This is another example of mixing both quality of lights... I am using the SOFT light that hits their faces and the front of their bodies while the Hard Light comes from behind lighting the top of their heads and some of the visible snow.
3.- The last example I will post today is a scene I took up in the Ogden Valley about a week ago, as the sun was setting and its last rays where hitting the Right side mountain and everything else was lighted by the soft reflection from the blue skies.
Feel free to comment and to ask any question.
Tuesday, October 15, 2013
Photos I took lately
My personal life and my life as a professional photographer moves, in the first place, around my beautiful family and church-related activities; then, in the "third place", around what I do to get all my photographs done... It's interesting to note that my job, even has the third placement in my "list of priorities" and it is not my main and fore-most important activity in my life, it takes most of my time during each individual day.
Because most of my days are spent behind the cameras or in front of my computers (a decade and a half ago I spent my hours in the darkroom, as well) I am capable of study as I work, I am able to communicate with many people in divers parts of the world simultaneously (including people from my house, my town, my country, my continent and even abroad), I edit photographs, and create what I think are pieces of artistic photography, I meet many, many people and become friends with most of them for a lifetime.
Here are some photographs I took recently and post in my facebook site over the past weeks... at least most of them as I can recall.
Enjoy them!


Monday, October 14, 2013
ADVENTURE PHOTOGRAPHY
This is our latest addition to "AA PROFESSIONAL Photography".
ADVENTURE PHOTOGRAPHY.
Dare to be a part of it !!!
Give us a call, now, to reserve your spot.!!!

There is a myriad of options for you and your group.
Let us know what are you looking for... like:
- Migrating birds watch.
- Sunrise over the peak of the mountains.
- Deer, Moose or Elk watch.
- Mountain goats.
- Bald eagles.
- Bears (Black, brown and Grisly).
- Star trails, low light and night photography.
- White sand desert
- Fall color workshop for portraits, landscapes, etc.
- Mountain biking on desert, mountains or coastal shores, etc.
- Etc.
801-603-9837
www.aa-photography.com
Thursday, October 10, 2013
Manual Mode "M"
Another fellow photographer experience.
When I was 16 and drove a car for the first time, my teacher took me to a large parking lot. He asked me to floor it as fast as I possibly could across the parking lot. This was my first time driving! So, I went for it. I felt like I was FLYING! Then, he told me half way across the parking lot to look at the speedometer. I was only going 10 miles per hour (16 kilometers)! The point is, the first time you try anything, it feels intimidating and like you’re out of control.The first time any of my students use a camera in manual mode, I can see them terrified to try it out. However, shooting in manual mode really isn’t as difficult as it may seem. To understand manual mode, the example below will be helpful.
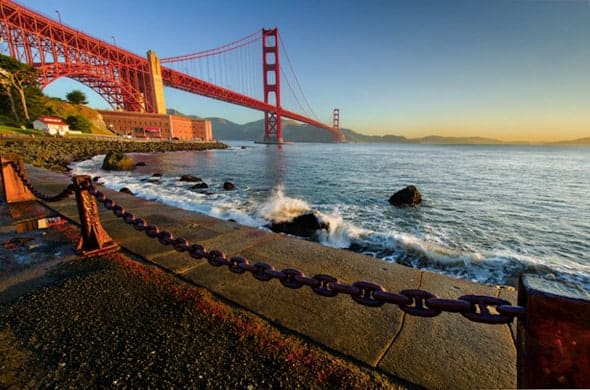
Manual mode. Aperture: f/18. Shutter speed: 1/60. ISO 100. Nikon 10-24mm lens. Nikon D7000 camera.
After taking the picture with the settings above, I realized that the picture was coming out a bit too dark with 1/100 shutter speed. So, I slowed it down to 1/60 and it looked just how I wanted.
The point is that, eventually, you’ll find yourself wanting to shoot in manual mode for situations where you aren’t rushed to get the shot. If you’re shooting sports, outdoor portraits, or other things, then aperture priority is simpler and faster than shooting in manual mode.
Aperture

Aperture
is often the most difficult concept for people to grasp when they're
learning how their camera works, but it's pretty simple once you
understand it. If you look at your lens, you can see the opening where
light comes through. When you adjust your aperture settings, you'll see
that opening get bigger and smaller. The larger the opening, or wider
the aperture, the more light you let in with each exposure. The smaller
the opening, or narrower the aperture, the less light you let in. Why
would you ever want a narrow aperture if a wider one lets in more light?
Aside from those situations where you have too much light and want to
let less of it in, narrowing the aperture means more of the photograph
will appear to be in focus. For example, a narrow aperture is great for
landscapes. A wider aperture means less of the photograph will be in
focus, which is something that's generally visually pleasing and isn't
seen as a downside. If you've seen photographs with a subject in focus
and beautiful blurred backgrounds, this is often the effect of a wide
aperture (although that's not the only contributing factor—remember,
telephoto lenses decrease depth of field as well). Using a wide aperture
is generally considered the best method for taking in more light
because the downside—less of the photograph being in focus—is often a
desired result.

Aperture is
represented in f-stops. A lower number, like f/1.8, denotes a wider
aperture, and a higher number, like f/22, denotes a narrower aperture.
Lenses are often marked with their widest possible aperture. If you see a
lens that is a 50mm f/1.8, this means it's widest aperture is f/1.8.
The aperture can always be set to be more narrow, but it won't be able
to go wider than f/1.8. Some lenses will have a range, such as
f/3.5-5.6. You'll see this on zoom lenses, and it means that when the
lens is zoomed out to the widest position it's f/3.5, but when it's
zoomed in all the way it can only have an aperture as wide as f/5.6. The
middle changes as well, so halfway through the zoom range you'll end up
with a widest aperture of about f/4.5. An aperture range is common with
less-expensive zoom lenses, but if you pay more you can get a standard
aperture throughout the range.
That's
pretty much all you need to know about aperture. The important thing to
remember is that a wide aperture, like f/1.8, lets in more light and
provides a shallow depth of field (meaning less of the photo appears in
focus). A narrow aperture, like f/22, provides deeper focus but lets in
less light. What aperture you should use depends on the situation and
the type of lens you're using, so experiment to see what effects you get
and you'll have a better idea of how your aperture setting affects your
photographs.
Shutter Speed
 Expand
Photo by Digi1080p
When you
press the shutter button on your camera and take a picture, the aperture
blades take a specific amount of time to close. This amount of time is
known as your shutter speed. Generally it is a fraction of a second, and
if you're capturing fast motion it needs to be at most 1/300th of a
second. If you're not capturing any motion, you can sometimes get away
with as long of an exposure as 1/30th of a second. When you increase
your shutter speed—the length of time where the sensor is exposed to
light—two important things happen.
First, the
sensor is exposed to more light because it's been given more time. This
is useful in low light situations. Second, the sensor is subject to more
motion which causes motion blur. This can happen either because your
subject is in motion or because you cannot hold the camera still. This
is fine if you're photographing a landscape at night and the camera is
placed on a tripod, as neither the camera nor your subject is going to
move. On the other hand, slow shutter speeds pose a problem when you're
shooting handheld and/or your subject is moving. This is why you
wouldn't want a shutter speed any slower than 1/30th of a second when
photographing handheld (unless you're known for your remarkably still
hands).
In general,
you want to use the fastest shutter speed you can but there are plenty
of circumstances where you'd choose a slower shutter speed. Here are a
few examples:
- You want motion blur for artistic purposes, such as blurring a flowing stream while keeping everything else sharp and un-blurred. To accomplish this you'd use a slow shutter speed like 1/30th of a second and use a narrow aperture to prevent yourself from overexposing the photograph. Note: This example is a good reason to use the Shutter Priority shooting mode discussed in the previous lesson.
- You want an overexposed and potentially blurred photograph for artistic purposes.
- You're shooting in low light and it's necessary.
- You're shooting in low light and it's not necessary, but you want to keep noise to a minimum. Therefore you set your ISO (film speed equivalent) to a low setting and you reduce your shutter speed to compensate (and let in more light).
These
aren't the only reasons but a few common ones. The important thing to
remember is a slow shutter speed means more light at the risk of motion
blur. A fast shutter speed means low risk of motion blur while
sacrificing light.
ISO

ISO
is the digital equivalent (or approximation) of film speed. If you
remember buying film for a regular camera, you'd get 100 or 200 for
outdoors and 400 or 800 for indoors. The faster the film speed the more
sensitive it is to light. All of this still applies to digital
photography, but it's called an ISO rating instead.
 Expand
Photo by CNET Australia
The
advantage of a low ISO is that the light in a given exposure is more
accurately represented. If you've seen photos at night, the lights often
look like they're much brighter and bleeding into other areas of the
photo. This is the result of a high ISO—a greater sensitivity to light.
High ISOs are particularly useful for picking up more detail in a dark
photograph without reducing the shutter speed or widening the aperture
more than you want to, but it comes at a cost. In addition to lights
being overly and unrealistically bright in your photos, high ISO
settings are the biggest contributors to photographic noise. High-end
cameras will pick up less noise at higher ISOs than low-end cameras, but
the rule is always the same: the higher you increase your ISO, the more
noise you get.
Most
cameras will set the ISO automatically, even in manual mode. Generally
you can stick with the same ISO setting if your lighting situation
doesn't change, so it's good to get used to setting it yourself. That
said, sometimes lighting changes enough in dark, indoor settings that
letting the camera set it for you automatically can be helpful—even when
shooting manually.
Combining the Settings
In manual
mode you set everything yourself (except ISO, if you set it to
automatic), so you have to think about all three of these settings
before you take a photograph. The best thing you can do make this easier
on yourself and hasten the decision is to give priority to one of the
settings by deciding what's most important. Do you want to ensure a
shallow depth of field? If so, your priority is your aperture. Do you
want the most accurate representation of light? Make ISO your priority.
Do you want to prevent as much motion blur as possible? Concentrate on
shutter speed first. Once you know your priority, all you need to do is
set the other settings to whatever is necessary to expose the right
amount of light to the photograph.
Tuesday, October 01, 2013
Happy October 01st !!!!
Happy October 01st !!!
It's amazing how fast this year have past (at least from my personal point of view). I've done quite a few things this year and kept myself busy as much as I could... to the point that I have not been able to accomplish other (more of a secondary) stuff.
This year my job (my company in photography and video) has taken me to different U.S. states, like Maryland, Virginia and Idaho.
I wanted to create a second version of "Spirits of the West Lakes" and "Mountain Spirits", but it was not possible (at least for now).
October first, to me, means that the year is almost over and I only have 3 more months to accomplish and to finish all what is still pending.
Then, Let's get busy!!!
Here is a photo I took just a week ago (or something like that).


Tuesday, September 24, 2013
Assignment #02
Here are the details of the Assignment #02 for Harmony students.
I am including this photo (below) for you to create and submit via email to: aaphotoart@gmail.com
 Remember the rules:
1.- Your subject have to be in following the "Rule of Thirds"
2.- The lighting have to come from on top but has to light the face (be creative)
3.- The photo HAVE TO BE well exposed!!!
4.- Must be send over email by Friday night (aaphotoart@gmail.com)
Tips:
1.- Work with your Manual Settings: Aperture keep it as open as your camera will allow you.
2.- Set your shutter speed 1/30 or so (be careful not to make sudden moves because your photo will be blurred).
3.- Set your ISO accordingly to get a well exposed photo.
Email me if you have questions to : aaphotoart@gmail.com
GOOD LUCK!!
AL Aguayo.
I am including this photo (below) for you to create and submit via email to: aaphotoart@gmail.com

1.- Your subject have to be in following the "Rule of Thirds"
2.- The lighting have to come from on top but has to light the face (be creative)
3.- The photo HAVE TO BE well exposed!!!
4.- Must be send over email by Friday night (aaphotoart@gmail.com)
Tips:
1.- Work with your Manual Settings: Aperture keep it as open as your camera will allow you.
2.- Set your shutter speed 1/30 or so (be careful not to make sudden moves because your photo will be blurred).
3.- Set your ISO accordingly to get a well exposed photo.
Email me if you have questions to : aaphotoart@gmail.com
GOOD LUCK!!
AL Aguayo.
Monday, September 16, 2013
Assignment #01
Dear students from Harmony education, this is the sample photo I want you to recreate as for your assignment this week.
Take a portrait like the one just here below:

Write your name and Include: Aperture setting, Shutter Speed and ISO in the body of the email.
In the subject write: Assignment 01
BE CREATIVE!! I will give extra points if you are more creative.
First of all, make sure you are subscribe to this blog!!
Send your photos to: aaphotoart@gmail.com
If you want to send something additionally, feel free, but make sure you send AT LEAST what I am asking you.
This assignment is due this Friday September 20th via email. Though, if you bring it of Monday 23rd I will consider them only for review.Enjoy.
Subscribe to:
Posts (Atom)